The FrediApp Solution
The purpose of the FrediApp solution is to give programmers a framework of an EDI solution that they can build on or simply get inspiration from to create their own comprehensive EDI solution. Unlike our other example programs that simply show how to generate, translate or validate EDI files with the Framework EDI component, the FrediApp solution is an end-to-end working model of an EDI application that integrates all EDI processes so that one can manage exchanges of EDI files between you and your trading partners.
Documentation for the UN/EDIFACT version can be downloaded here

The FrediApp solution has the following projects:
- FrediAppSetup – to configure your company’s profile as well as your trading partners’ information.
- FrediAs2Client – sends EDI files by AS2
- FrediA2Server – receives AS2 messages
- FrediGen_TradingPartnerA – Generates EDI files for one trading partner
- FrediTran_TradingPartnerA – Acknowledges and translates EDI files for one trading partner
The FrediAppSetup Project
The FrediAppSetup program creates the default folders where the EDI files are saved at each step of the process. It is also where you can enter your company’s profile as well as your trading partners’ EDI and AS2 information.
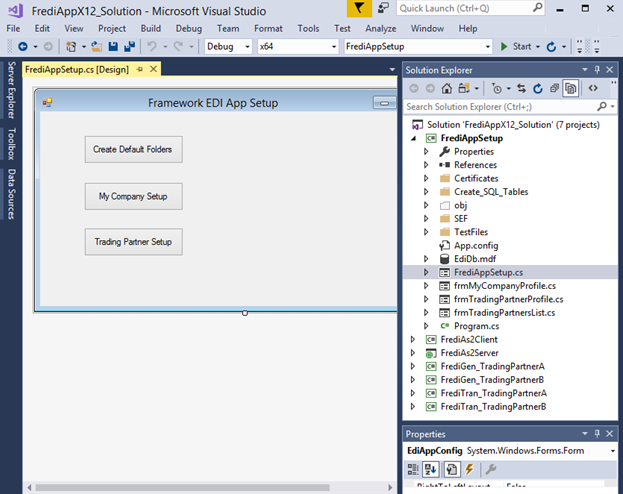
Included with the project are sample EDI files in the TestFile folder; evaluation SEF files in the SEF folder; a test certificate in the Certificates folder; and SQL scripts for creating the database tables in the Create_SQL_Tables folder.
Also, included is a local SQL database named EdiDb.mdf that ties all five projects together. It will be used as an intermediate database and is the go-between storage for your data in your production database and EDI files.
The FrediAppSetup form consists of three buttons:
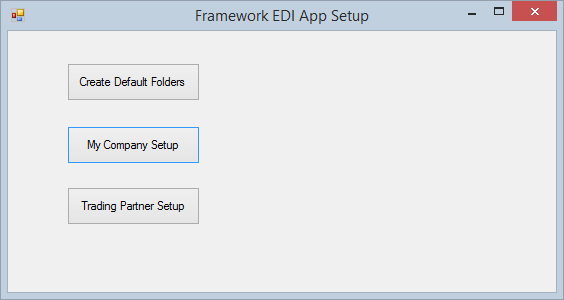
The Create Default Folders button creates the following folders:
- AS2_OUTPUT – This is where copies of AS2 files that were sent, and MDN files that were received are located.
- EDI_997 – This is where completed inbound 997 EDI files (after being processed) are stored.
- EDI_DONE – Inbound EDI files (other than 997) that were accepted and translated are saved in this folder.
- EDI_INBOUND – Inbound EDI files that were just received by the AS2 Server and ready to get validated and acknowledged are in this folder.
- EDI_OUTBOUND – Outbound EDI files ready to get sent wait in this folder.
- EDI_REJECTED – Inbound EDI files that failed validation and rejected are moved into this folder.
- EDI_SENT – Outbound EDI files that were successfully sent are saved in this folder.
- EDI_SENT_FAILED – Outbound EDI files that were not successfully sent are kept here.
Documentation for the UN/EDIFACT version can be downloaded here
The My Company Setup button brings up the company configuration form:
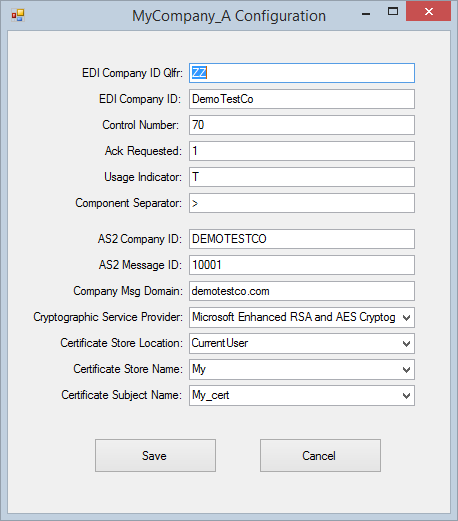
- EDI Company ID Qualifier – This is the value in the Interchange ID Qualifier (ISA05 or ISA07) of your EDI file.
- EDI Company ID – This is the value in the Interchange Sender ID (ISA06) of your outbound EDI files. EDI files you receive will have this value in the Interchange Receiver ID (ISA08).
- Control Number – This is the next available number that will be used as an Interchange Control Number (ISA13) for the next generated outbound EDI file.
- Ack Requested – Enter 1 if you want your trading partner to send you a TA1; otherwise enter 0.
- Usage Indicator – If you are generating a test EDI file, enter a “T”; otherwise enter “P” for production data.
- Component Separator – Enter the character that will be used for a Component Element Separator (ISA16) in your EDI file.
- AS2 Company ID – This is your company ID that will be displayed in the AS2-From header of the AS2 message. Typically, this is the same value as your EDI Company ID.
- AS2 Message ID – This is the next available number and in conjunction with the Company Msg Domain will be used in the Message-ID header for the next AS2 message sent. This is used to reference your AS2 message.
- Company Msg Domain – This is your company domain, which will be concatenated with the AS2 message ID to create a globally unique Message-ID for your AS2 message.
- Certificate Subject Name – Select your security certificate name that will be used to decrypt and sign AS2 messages. This will be the certificate that you will send to your trading partner so that they can encrypt the AS2 message they send you as well as authenticate the messages they receive from you.
- Cryptographic Service Provider – Choose a CSP that will support the encryption and hashing algorithm that you and your trading partner are using.
- Certificate Store Location – Select the registry location where your certificate was installed.
- Certificate Store Name – Select the name of the Certificate Store where your certificate was installed. (See eSecurityConsole utility).
The Trading Partner Setup button takes you to the following form:
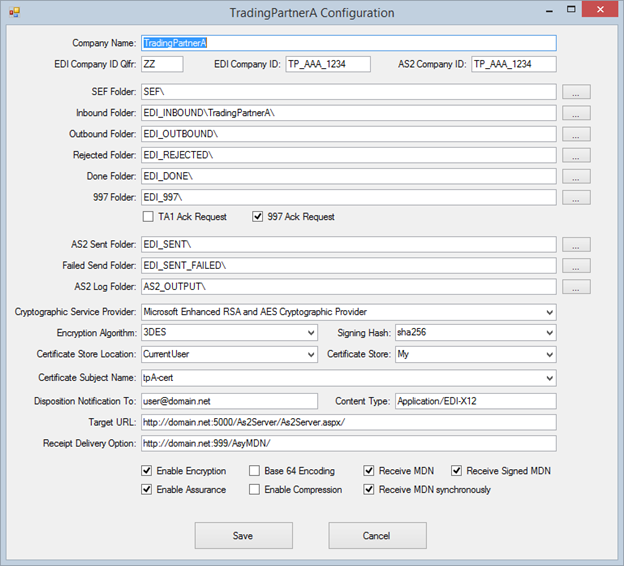
- Company Name – The name of the trading partner. This should be the same value as what was entered in the TradingPartner key field in the app.config file of the FrediGen and FrediTran programs.
- EDI Company ID Qlfr and Company ID – These are values in the Interchange segment position ISA05 and ISA06 respectively of inbound EDI files; and in position ISA07 and ISA08 of outbound EDI files.
- (See create Default Folder for meaning of folder fields.)
- TA1 Ack Request – If this trading partner wants a TA1 acknowledgment sent to them, then check the box; otherwise leave it blank.
- 997 Ack Request - Check the box if this trading partner wants a 997 acknowledgment sent to them.
- Cryptographic Service Provider – Choose a CSP that will support the encryption and hashing algorithm that you and this trading partner are using.
- Certificate Store Location – Select the name of the registry location where this trading partner’s certificate (public key) was installed.
- Certificate Store Name – Select the name of the Certificate Store where this trading partner’s certificate was installed. (See eSecurityConsole utility).
- Certificate Subject Name – Select the trading partner’s security certificate name that you will use to encrypt the AS2 message you will send them. This will be the same certificate to authenticate the messages you receive from them.
- Encryption Algorithm – Choose the encryption algorithm that this trading partner is using.
- Signing Hash – Choose the hashing algorithm that your trading partner is using.
- Disposition Notification To – Enter your contact email should this trading partner want to contact you regarding the AS2 message.
- Target URL – Enter the trading partner’s AS2 Server URL address. This is where you will be sending the AS2 messages for them. (Make sure to end it with a forward slash “/”.)
- Receipt Delivery Option – If asynchronous MDN is requested, enter the address of where the MDN should be sent.
The FrediGen_TradingPartnerA Project
This program processes the EDI outbound for one trading partner. For this specific example, the trading partner is named “TradingPartnerA”. If you have another trading partner, then you would need to create another project for them. You could copy this project and rename it with the other trading partner’s name. For example, if your other trading partner’s name was “TradingPartnerB”, then you would rename the copy of the project to FrediGen_TradingPartnerB. Also, in the App.config file, you have to change the value in the “tradingPartner” key field to “TradingPartnerB”. This name must be consistent with the value in the Company Name field of the TradingPartner table in the EdiDb.mdf database.
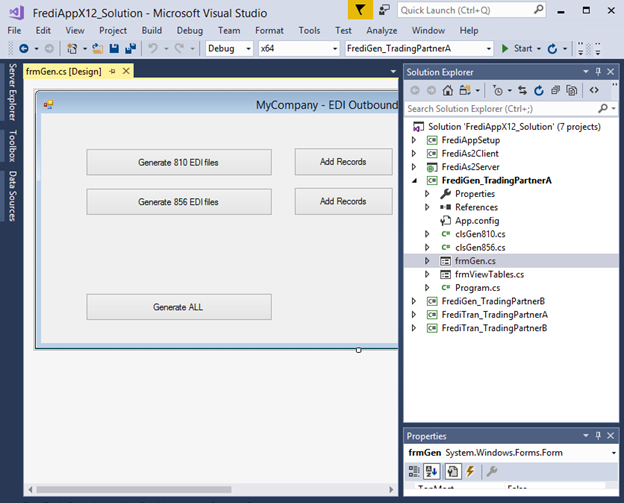
The Outbound Process has two steps:
The first step is to pull data from your production database and store them into the intermediate database. This is the function of the Add Records button; however, in our example, we are populating the intermediate tables with fixed static data. But in practicality, you would have to change this code to pull data from your own production database and populate the intermediate tables with them. (The View Tables and Delete Tables buttons will view and delete only the records that were added into the tables.)
Once the data are in the intermediate database, can you do then the next step, which is to generate an EDI file by clicking on the Generate button.
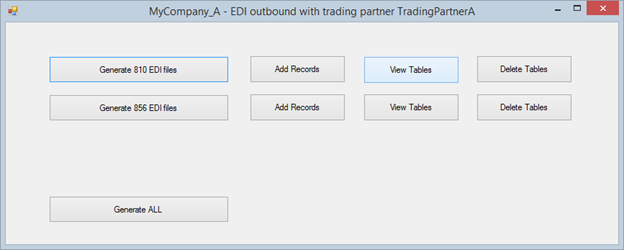
Note that for every transaction set, you would need a set of these buttons. For example, you would need an Add Records and Generate button for Transaction Set 810; and another set of Add Records and Generate button for Transaction Set 856. The methods for adding records into the database and generating the EDI files are kept in their respective classes named with a Transaction Set Number. For example, the class name that has the methods regarding generating Transaction Set 810 is clsGen810 while for Transaction Set 856 is clsGen856. The methods in these classes have the same name, but their functionality is specific to their transaction sets. If you wanted to create a 940 outbound process for this trading partner, you could simply copy one of the classes, then modify the methods to the specifications of the transaction set and trading partner’s requirements.
EDI files generated in this project will be put in the EDI_OUTBOUND folder.
The FrediTran_TradingPartnerA Project
This program processes the inbound EDI files for one trading partner. For this example, the trading partner is named “TradingPartnerA”.
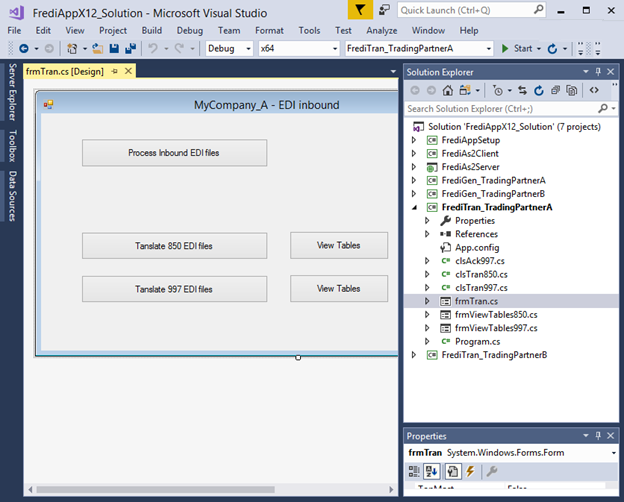
Like the outbound program, you would have to create another program for other trading partner(s) should you have several of them. You can do this by using the existing one as your base and starting point. Just copy this project, rename it appropriately, change the trading partner's name in the app.config file, and then make the necessary modifications to the program according to your trading partner's specifications.
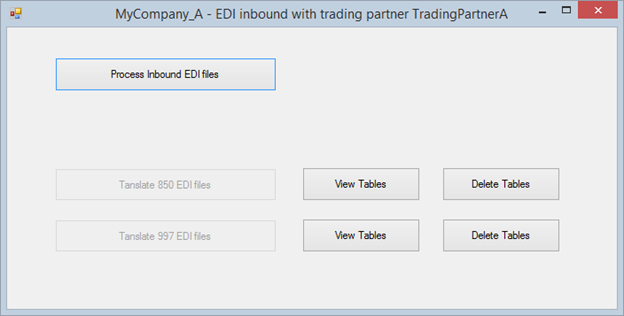
The Inbound Process starts by validating the EDI files (located in the trading partner’s subfolder in the EDI_INBOUND folder) and at the same time creates the 997 and TA1 acknowledgments (if requested). The acknowledgment files are created in the EDI_OUTBOUND folder ready to get sent back to the trading partner to acknowledge the EDI files received from them. If the inbound EDI file passes validation, it is immediately translated, and the data is saved in the intermediate database. The EDI file is then moved to the EDI_DONE folder once translation is completed. If the EDI file fails validation, it is moved to the EDI_REJECTED folder. A rejected EDI file does not get processed further.
If an inbound EDI file is a 997 (Functional Acknowledgment), it will be translated immediately without going through the validation process. When completed, it will be moved to the EDI_997 folder.
Like the design of the FrediGen project, the FrediTran project has a class for each Transaction Set it will be translating. So, this example has a class clsTran850 for translating inbound 850 EDI files, and a class clsTran997 for translating 997 EDI files. And similarly, to add more Transaction Sets and trading partners you can just copy classes and projects respectively and then make the necessary modifications that are specific to the Transaction Set and trading partner.
(The clsAck997 class is for validating and creating 997/TA1 acknowledgment files and would be required in all copies of the FrediTran projects.)
The FrediAs2Client Project
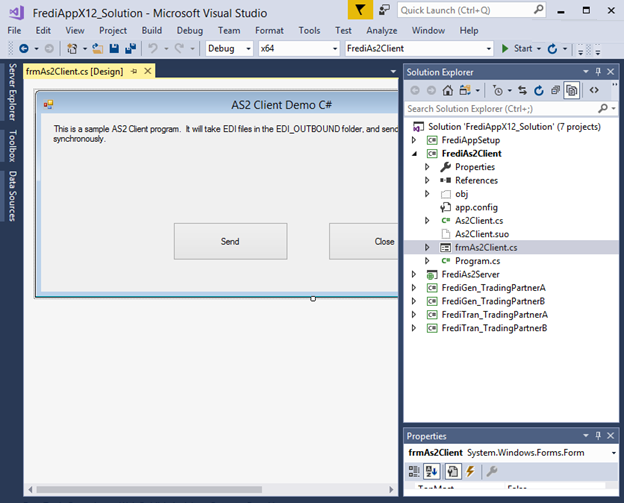
The As2Client program sends EDI files by AS2. It takes the EDI files in the EDI_OUTBOUND folder, reads their Interchange Receiver ID (ISA08), and looks it up against the EDI_CompanyID field of the TradingPartner table to determine where and how the EDI files are to be sent.
EDI files that were successfully sent are moved to the EDI_SENT folder, while those that failed are moved to the EDI_SENT_FAILED folder.
A copy of the sent AS2 file and the received MDN (acknowledging the receipt of the AS2 file) are put in the AS2_OUTPUT folder.
The FrediAs2Server Project
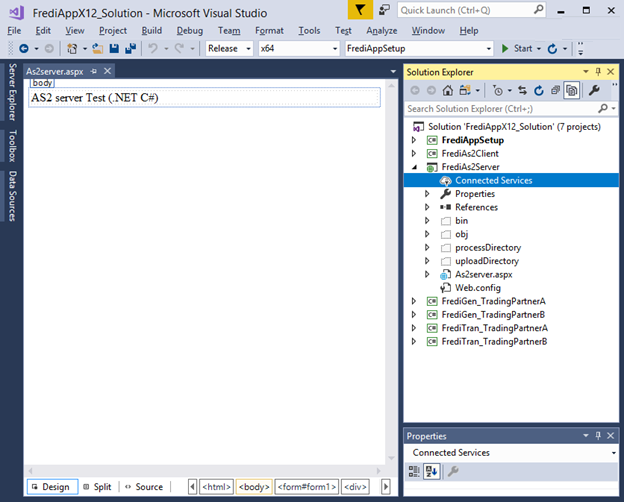
The AS2Server program receives AS2 messages from your trading partners. When an AS2 message is received, the program first reads its AS2-From header to obtain the sender ID. It then looks for this ID in the EDI_CompanyID field of the TradingPartner table to obtain the trading partner’s setup and determine how the message should be decrypted, and where the extracted EDI file should go in the EDI_INBOUND folder.
Unlike the other projects (which are Desktop Applications), the FrediAs2Server project is a Web Application that requires IIS.
A quick run-through of the Framework EDI Application
Below are YouTube videos that explain the FrediApp in more detail
- The FrediApp Solution - Part1 (The setup and generating EDI files)
- The FrediApp Solution - Part2 (AS2 Client and Server: Exchanging AS2 mesages)
- The FrediApp Solution - Part3 (Translating EDI files)
Documentation for the UN/EDIFACT version can be downloaded here
Click here to evaluate the Framework EDI